


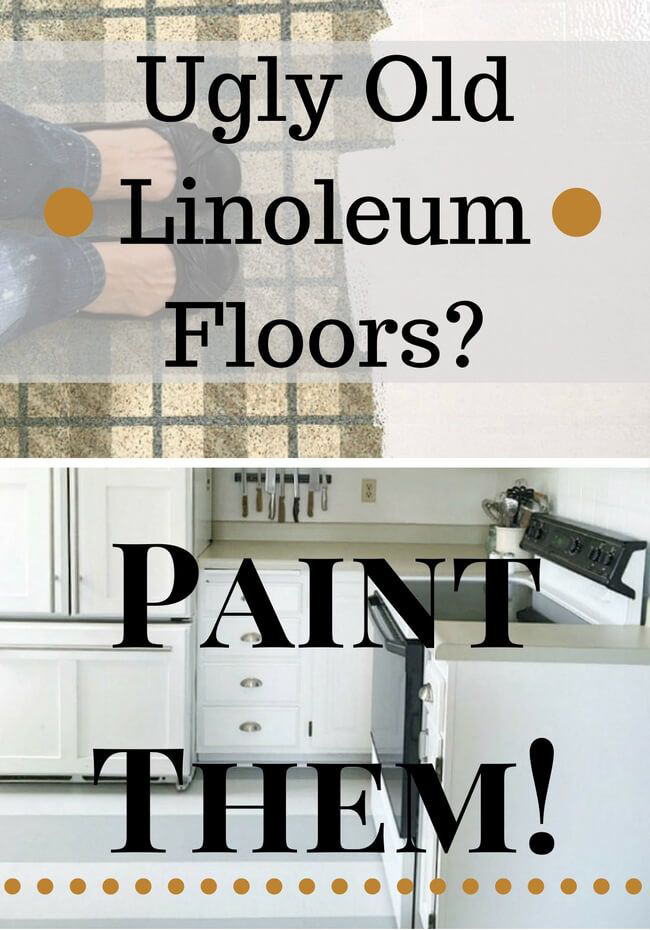
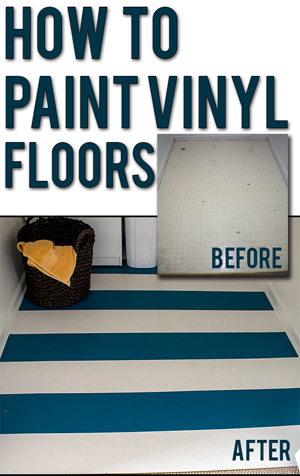
Give your favorite room a fabulous face lift.
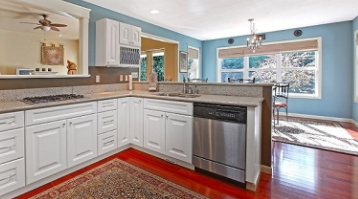
Updating your kitchen can be an expensive project... or not. Investing the minimum doesn't mean you won't get a great result. Paint offers maximum impact for low cost, especially if you make it a DIY endeavor. It can be applied to almost any surface - including countertops! Read on for ideas on how to use paint to your advantage in the kitchen.
For many of us, the kitchen is the heart of the home – it’s the place where we cook, where we gather to eat and where we choose to entertain. It can often do double-duty as a playroom, dining room, laundry, home office and more. Therefore, it’s no surprise that kitchens often show wear and tear quickly.
Thankfully, creating a new look in your kitchen doesn’t mean you need to start again from scratch. Transformations can often be quick and simple – and most need next-to-no tools. We’re talking low mess, low fuss, and maximum impact.
To get you inspired, here are our top tips to inject a breath of fresh air into your kitchen. They’re easy projects that can be completed start to finish in a couple of hours at most. So grab your supplies, let’s get started!
Feed not found.
Country and Town House
30 July 2026
A Life in Balance-
The Best Wedding Venues in New York City
It’s official: Taylor Swift and Travis Kelce
... -
Alpine A290 Review: French Flair & Driver Engagement Under £35,000
Alpine revived its hot hatchback credentials
... -
11 Of The Most Beautiful Wedding Shops In London
Finding the perfect wedding dress is high up
... -
‘Homer Is For Everyone’: How Emily Wilson Elucidates & Obfuscates In Equal Measure
Classicist Emily Wilson has made headlines in
... -
Celebs Are Leading The Euro Summer Trend – Here Are The Hottest Destinations For 2026
It’s the year of the euro summer, and the
...
Rawlins Blog
30 July 2026
Paint & Decorating Advice-
How to Fix a Loose Doorknob or Door Handle
A loose doorknob is usually fixed by
... -
Thermoguard vs Crown vs Johnstone’s: Which Flame Retardant Paint Is Best?
Looking for the best flame retardant topcoats
... -
How to Remove Adhesive Residue Without Damaging Surfaces
Adhesive residue should be removed by
... -
How to Clean Windows Without Streaks
Clean windows without streaks by washing the
... -
How to Clean a Patio Without a Pressure Washer
Quick answer: The safest way to clean a patio
...

- Home improvement tips
Painting Kitchen Walls and Ceiling
 Advantages of Ceiling Paint
For the kitchen, latex or any water-based paint specifically developed for ceilings is an ideal choice. Ceiling paint has a formulation that drips less and dries faster than interior or wall paints. It also has a lower splatter factor than other interior paints. The finish of most ceiling paints is flat or matte, which helps to disguise defects. Ceiling paint is also less expensive than other high-end interior paints. Some ceiling paints are only available in white; if you desire a different hue, ask a store representative whether they have a tintable ceiling paint.
A stain-blocking, all-in-one ceiling primer and paint delivers a fresh new covering that hides hard-to-remove stains for a kitchen ceiling that appears grimy even after a complete cleaning.
Water-Based Interior Paints
Water-based interior paints, such as latex or latex enamel, are also suitable for use on a kitchen ceiling. As an extra bonus, there are a variety of color and sheen possibilities, which is useful if you don't want a matte white kitchen ceiling or if you want to match the ceiling and wall colors. Paints for the ceiling and walls can be applied with a brush, roller, or sprayer.
Choosing the Right Sheen
Flat paint is the least reflective in terms of paint sheen, or its ability to reflect light. The most reflective is high-gloss, which appears shiny when a lot of light hits it. The more glossy the paint, the more washable it is and the more flaws it will reveal. A flat or matte paint is ideal for the ceiling in many spaces because it does not require frequent cleaning. A more washable paint is recommended if the kitchen ceiling appears oily from spatters over the stove area.
For a more lasting coating that doesn't shine much, choose an eggshell finish, which is approximately as shiny as an actual eggshell. Satin or semi-gloss paint is even easier to clean, but it will highlight many of the defects in the ceiling. Satin or semi-gloss are good choices if your ceiling is perfectly smooth. Matte ceiling or wall paint is a wonderful alternative for a popcorn ceiling or a surface with multiple dips or faults. Look for a water-based paint that can be washed. If the can is washable, it will state so on the label.
- Home improvement tips
Custom Kitchen Cabinet Designs
According to home remodeling company Bedford, NH, whether you are installing new kitchen cabinets or upgrading existing available from a broad selection of home design and improvement shops, semi-custom kitchen cabinets permit for a fantastic
 balance between price, efficacy and custom layout.
There are 3 standard forms of cabinet layouts. Custom kitchen cabinets are made from scratch in accordance with a particular design asked by the client. Semi-custom cabinets incorporate inventory elements but permit some customization from the client. Stock cabinets come fully designed and constructed "as-is."
Each cupboard type has advantages and challenges. Customized cabinets offer you complete freedom concerning layout, but are undoubtedly the most expensive. Semi-custom cabinets are at the mid century concerning price, however they do provide some layout freedom. Stock cabinets would be the most affordable, but you need to content yourself with the company's design.
Combination of versatility and price, semi-custom kitchen cabinets might be the ideal alternative for you. You may often select finishes or colors, different hardware and door types, or possibly a variety of substances for your walk-in cupboards. They'll take slightly longer to send than stock cabinets, but a lot of homeowners find the liberty of having layout input to be well worth the extra time and cost.
Homeowner's special design requests. This laborious procedure takes some time and consequently prices cash.
The primary advantage of utilizing custom They're completely created to order and so can be customized in size and layout so as to fulfill the demands of your particular kitchen. The most unique or hard space could be matched with custom cabinets so as to ensure it is a practical kitchen. The options are endless for your amount, size, shape, thickness, accessories and finishes, so you are guaranteed to end up with a room that is tailor-made for your own cooking and dining needs.
This creative freedom Includes a Low cost tag. Cabinetmakers have high costs associated with their job, and also the superior materials typically utilized in custom cabinetry tend to be pricey. Hand-crafted ornamentation added into your cabinets or hand-painted faux finishes may drive up the price of custom cabinets, as will the hardware along with extra accessories selected to finish the appearance.
A Last concern for a homeowner Employing custom cabinets is that due to their made-to-order temperament, a strategy has to be in place before installing and building the cabinets. Planning tools are available on the internet in addition to through contractors. Blueprinting the specifications out of your precise cabinets may add additional time for your job originally, but it is going to save yourself money and time by keeping you away from making expensive mistakes in the long term.
Unusual kitchen area or distinctive design style, custom cabinets might be just What it is you're searching for. Creative liberty coupled with quality workmanship Make custom cabinets an attractive alternative for all those that have a massive budget and Flexible project deadline.
- Home improvement tips
Remove Fabric Paint from Carpet
Latex paint is water-dissolvable, so it is simpler to eliminate than oil-based paint. You can probably eliminate all or the vast majority of the dried paint in the event that it is latex paint, yet it is improbable that you can eliminate the entirety of an oil-based paint stain. On the off chance that you don't realize which sort of paint is on your rug, treat it as latex paint first.
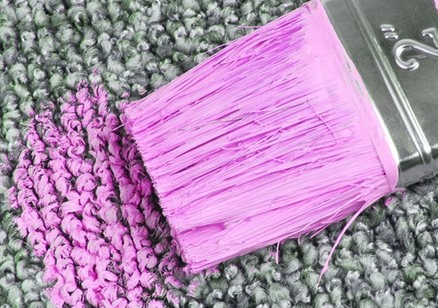 Latex Paint
 Scratch off as a significant part of the dried paint as possible with a blade. Eliminate or extricate enormous spots of dried paint with needle-nose forceps.
Immerse the dried paint with water, at that point vacuum the territory with a wet/dry vacuum. Rehash this cycle to eliminate however much paint as could be expected.
Add 1/4 teaspoon dish-washing cleanser or vinegar to 32 ounces water. Empty the combination into a shower bottle.
Shower the cleanser arrangement onto the paint stain and scour the territory with a hardened brush. Keep showering and cleaning the territory to eliminate the paint. In the event that the stain is as yet present, follow the means for treating oil-based paint stains.
Oil-Based Paint
Clean the territory with a steam cleaner to eliminate the paint. Rehash to eliminate however much of the paint as could reasonably be expected.
Touch a material in acetone hydrogen peroxide or paint thinner and smudge the stain to eliminate the paint. This strategy may cause staining of the carpet. Keep smearing to eliminate however much of the stain as could reasonably be expected.
Trim the strands of the rug with some scissors to eliminate paint on the tips. Cut the rug strands directly beneath the paint to eliminate as meager of the filaments as you can while eliminating however much paint as could be expected. This strategy ought to be utilized if all else fails, as eliminating a lot of the carpet will make the spot look uncovered.
Things You Will Need
Blade
Needle-nose forceps
Wet/dry vacuum
1/4 teaspoon dish-washing cleanser or vinegar
32 ounces water
Splash bottle
Hardened brush
Steam more clean
Cloth
Acetone, hydrogen peroxide or paint thinner
scissors
- Home improvement tips
How To Clean Up After Painting
 Cleaning Rollers
Scratch the abundance paint once again into the can with a clay blade or comparable, at that point flush with warm water. When you have expelled the greater part of the paint, include somewhat cleanser and work into a foam. After this has been done, flush the roller altogether and shake off the overabundance water. Next let the roller air dry, wrap it firmly in cling wrap and close it immovably with a wire tie. Store the roller vertically supposing that it's put away on its side, that side can be straightened.
Cleaning brushes
You're going to require lukewarm water, mellow cleanser and a lot of persistence. Start by clearing off any overabundance paint utilizing a fabric or delicate tissue. Delicately crushing the fibers with your fingers or with a fabric will assist with expelling the paint from the brush, yet don't pull on the fibers.
Next wash the brush in tepid water on the off chance that you've been utilizing a water-based paint. Never utilize high temp water as it can make the fibers drop out, at that point wipe on the fabric again to expel the remainder of the overabundance paint.
Wash cautiously utilizing a touch of mellow cleanser (instead of dishwashing fluid) by spotting the brush delicately onto the bit of cleanser, at that point stirring up a foam in a little holder or the palm of your hand in case you're not utilizing any harmful shades or solvents. Do this process again until there's no hint of any shading coming out, at that point wash again in perfect, tepid water to evacuate any hints of cleanser. Never utilize a great deal of strain to compel paint out of a brush, rather be patient and flush it a few times.
Shake off the water and utilize your fingers to delicately shape the brush head into its right shape. The subsequent stage is to enclose the fibers by a bit of tissue or bathroom tissue while the brush is as yet wet. At the point when the paper dries it'll contract, maneuvering the fibers into shape.
At long last leave brush to dry at room temperature. Guarantee it's not laying on its head as it will dry deformed. Standing it on the rear of the handle functions admirably. For assurance and life span, store your brushes enveloped by paper or material.
Cleaning oil-based paint from brushes and rollers
You'll require a basin, old dish, acetone, papers and paper towels. The acetone is harmful, so acceptable ventilation is required to abstain from breathing in exhaust. Put the roller in the skillet and brushes in the basin, at that point cautiously spread them with acetone. Permit them to sit for a few hours or overnight, and the oil-based paint will fall off the brushes and rollers and choose the base.
At the point when that is done, blast the brushes and rollers delicately side to side to evacuate abundance acetone, at that point set the brushes and rollers on the paper and spot them with paper towels to expel any overabundance more slender. At last, permit them to air dry. On the off chance that the entirety of the oil-based paint isn't expelled, you should rehash this procedure until it is.
- Home improvement tips
What is the Best Non Toxic Paint?
What Exactly Are Non Toxic Paints?
 Non poisonous paints are liberated from synthetic compounds that are in any case unsafe to nature or could for all time or incidentally influence the wellbeing of the house occupants. Adhering to that definition, we can trim down non lethal paints to three fundamental sorts: normal paints, low VOC paints, and zero VOC paints. Here's a concise clarification of each kind.
 Common Paints
Common paints are very uncommon and are not promptly accessible in outlets across the country. These paints just contain crude fixings that incorporate however are not constrained to dirt, plant oils, and some of the time even beeswax. All or the vast majority of the fixings are acquired from regular sources, consequently disposing of any opportunity of poisonous quality. With respect to the viability of these paints, they don't keep going as long as the vast majority would wish them to last. Since they are very uncommon, characteristic paints can be expensive. They come in restricted shading ranges, which is a major issue for purchasers who love shading coordinating.
Low VOC Paints
Unstable natural mixes, all the more regularly known as VOCs, are found in most development materials and not simply paints. These mixes, because of their unpredictable nature, vanish and disseminate into the air, where they might be destructive to both the earth and individuals every now and again presented to them. Low VOC paints have a limit of 50 grams of VOC per liter contrasted with 300 grams for every liter of standard paints, making Low VOC paints a more advantageous option in contrast to standard paints.
Zero VOC paints
There is some disarray encompassing zero VOC paints with respect to the specific substance of VOC per liter in the paints. Perhaps on account of the name, numerous individuals are slanted to think Zero VOC paints are totally liberated from any VOC. Actually, zero VOC paints can contain as much as 5 grams of VOC per liter, which is very irrelevant, subsequently the term zero VOC paints. These paints are an incredible choice for wellbeing cognizant customers and nature.
What Are Some Benefits of Non Toxic Paints
Picking a low VOC paint, or far better, a zero VOC paint, benefits your family's wellbeing and is less unfavorable to the earth. Here are a couple of advantages of utilizing non lethal paints over regular paints for your work of art needs.
Low and Zero VOC paints significantly diminish harmful allergens that are typically connected with different paints. These paints are perfect for people with concoction sensitivities or are adversely affected by specific mixes in the paints. They can serenely come back to the painted space not long after composition, or may even have the option to take part in the work of art process.
Low and Zero VOC paints work similarly just as traditional paints, and some state they work far and away superior. So you don't need to stress over settling on the nature of your completions.
Low and Zero VOC paints are simpler to clean than standard paints, all you need is some cleanser and clean water and with a delicate wipe dispose of any stains on your dividers.
Ideally you currently have a superior comprehension of non harmful, eco-accommodating paints and are all around familiar with the advantages of these kinds of paints.
- Home improvement tips
Construction equipment selling hints
You've Got heavy equipment or trucks to sell, and, like most Equipment vendors, you need top dollar. Considering most heavy equipment demands a significant outlay of money to buy initially and to keep indefinitely, who would not? So it only seems reasonable to want to recoup a good amount of your investment when it is time to market.
Know what your equipment is worth
Do your homework and research equipment pricing and business trends For similar equipment. Utilize the latest information it's possible to locate and establish a price range for your gear. Having a price range can help you negotiate confidently and set realistic price expectations.
Research selling methods
Condition and how fast you want to complete the sale, there's a selling strategy for construction equipment sales columbus ohio. To know what advertising process would work best for you, educate yourself on the pros and cons of common equipment selling methods, such as unreserved auctions, booked auctions, private sale, equipment dealers and gear brokers.
Visit a pro
As tempting as it may be to go it alone, think about the amount of time and Effort you'll have to put in the selling process - and the amount of possible buyers you may reach without the support of an expert in sales and marketing. You may save yourself a great deal of time and money with a full size solution, especially if you're selling a great deal of items, don't have a committed asset manager or work in a region with high supply/low demand for used equipment. Speak to an experienced salesperson about creating a selling strategy designed to get you the very best return on your investment.
Show the value of your equipment
The way your gear looks can either deter buyers or bring higher supplies. Before you sell, consider heavy equipment refurbishing. Refurbishing may consist of cleaning, glasswork, upholstery cleaning, painting, decal replacement or any place in the refurbishing menu.
Target buyers wisely
Try to target the maximum gear buyers that you can, but neglect'™t sacrifice Quality for volume. Work with an equipment vendor that not only actively markets into a huge population of gear buyers, but targets its advertising efforts based on the industry your gear is best suited towards and the area where there is the most requirement. Marketing your equipment may be the most time consuming and expensive step in the selling procedure, so make certain to choose an equipment seller with proven marketing expertise.
Be transparent
Provide detailed photographs and info regarding your equipment. Include photos Remember: buyers love convenient online access to gear info. However, some buyers are weary of purchasing equipment they are not able to view and test first hand. If you are employing a marketing agent or auction company, choose one that publishes detailed equipment information online and accommodates on-site inspections.
Screen buyers
When you receive an pleasant deal, the last thing you want is for the deal To drop through. Screen potential buyers before you accept an offer or work with A marketing agent that verifies the legitimacy of possible buyers for your benefit. At Ritchie Bros.. Auctioneers, we qualify potential buyers before the auction to Prevent prices falling through and ensure that sellers get paid. To assist buyers Close the deal, Ritchie Bros. also provides affordable equipment Financing.
- Home improvement tips
Tips for cleaning your painted walls
Keep a freshly painted look on your walls by keeping them free from dust and stains. Plus, preventive maintenance means less time spent scrubbing afterwards.
Vacuum walls with a soft brush attachment. Then wipe them down using a Cloth-covered broom or mop (spray using a dusting agent for best results) or use an electrostatic dusting wipe. Wipe away fingerprints and other marks shortly once they appear. House cleaning columbus ohio recommend to avoid using an excessive quantity of water.
Walls Painted with Latex Paint
Wash walls painted with latex paint using warm water and a nonabrasive all-purpose cleaner. Gently rub the wall. Pay special attention to regions that get touched frequently - such as around doorknobs and light switches. Rinse with another sponge and very clear water. Be careful not to wet areas around sockets, light switches, telephone jacks, and other electrical connections. When scrubbing these stains becomes mandatory, turn off power at the circuit breaker box.
For stubborn spots, such as fingerprints, paper smudges, or scuffs, make A paste of baking soda and water and rub the region with a nonabrasive pad. If cleanser (or white vinegar and water) does not eliminate the grime or blot on painted woodwork, wipe the woodwork with a rag dampened with rubbing alcohol.
Walls Painted with Oil-Based Paint
Wash walls painted using multi-colored paint in the Exact Same manner, substituting Detergent solution (see below) for your own cleaner or white vinegar mix. Wring The cloth or sponge until only slightly damp. Texture-painted walls, such as People that have a troweled finish, can be dust catchers and may require deeper cleaning. Add 1 oz of borax to every pint of water to clean the wall.
Recipe for All-Purpose Detergent Solution
Stir 1
Insert 1/4 Teaspoon of vinegar.
Let Solution sit stain for 10 minutes before blotting.
- Home improvement tips
Recommendations for fire and water damage restoration
With fires there will likely always be a level of smoke harm to your walls, wall Paper and paint. If the smoke harm is not too severe, you should be able to wash it clean with detergents and bleach. Note: soot from smoke damage is fatty stuff so that you ought to always try to dust as a lot off it out of a surface before attempting to scrub it clean. Often, you will want to repaint, but be certain all surfaces are clean and dry before painting.
Another huge issue in fire and water damage restoration is actually introduced by the Water used to extinguish a fire. This problem is mold and mildew, and demands special attention. We highly recommend fire damage restoration professionals to manage mold and mildew, since it can cause significant health issues, and can contaminate furniture, rugs, clothes, mattresses, walls and vents. The best thing you can do quickly is air out every room and wash out all filters and vents.
Fixing Flooring & Carpet
With all the water That's involved in putting out a fire, your flooring and Rugs will wind up absorbing the worst of it. In virtually every case, it's suggested that you pull any carpets that have water damage and replace them. Water may also seep underneath vinyl flooring and into cracks of hard wood, and will have to be addressed. If you have experience with floors, you can lift it up and clean under them, but you may want to call an expert fire damage restoration company to assist you.
Cleaning smoke harm from clothing is among the biggest tasks you'll find Following a fire. We have written a whole article on Restoring Clothing of Smoke Damage. Our main suggestion is to make certain that you don't split the fatty soot to the clothing or merely throw the smoky clothes into the scrub. Frequently times cleaning is your best bet, and you need to ask around local dry cleaners to find out if any have experience with post-fire laundry.
Cleaning Dishes
Dishes are also significant items to wash thoroughly after a fire as They will be in contact with your food and can cause health problems. Scrub all Dishes let them soak in a solution of bleach and water (2 tablespoons of Bleach per gallon) for 20 or more minutes and scrub some more for security. When In doubt, if a dish, pot or pan will not come clean, cut your losses and throw it Out -- (especially rubber or wooden dishes that absorb smoke).
- Home improvement tips
How to seal your driveway?
Seal your asphalt drive properly and it might last up to 30 decades.
Driveway sealing groundwork
A asphalt driveway may last nearly 30 decades. However, you can not attain that lengthy life span unless the drive was set up correctly and you perform routine maintenance, such as filling cracks yearly and drive sealing when required.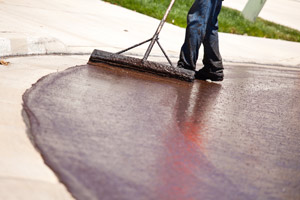
Driveway sealing groundwork can have a complete day (including drying time), and it is tedious. The program period is much quicker, taking just a couple of hours per coat to get a normal driveway. Seal coating Columbus recommends two coats using a minimum drying period of eight hours between coats, therefore this driveway sealing job will fill an whole weekend.
The materials cost about $100, but you are going to save approximately $200 in labour on a professional job. A power washer rates the cleanup procedure, but it's possible to do the job with no.
Avoid these Frequent driveway sealing mistakes
Fill them correctly before applying sealer.
If you do not need to spend some time cleaning the driveway, then you might too bypass the mop too, since it won't adhere to a cluttered driveway.
Struggling to stir correctly. Do not rely on a stir rod. It simply will not combine the solids and water sufficient to acquire a consistent mix.
The use of the incorrect applicator.
Implementing dyes too frequently. An excessive amount of bleach will flake out. Wait till you start to see asphalt aggregate until you apply a fresh coat of sealer.
Purchasing the Ideal stuff
Driveway sealer can be found in a variety of grades and price ranges, from as small as $15 each 5-gallon pail to approximately $35 each pail to get a superior product. Some purchase merchandise contain nearly 50 percent water and also have lower coverage rates along with a correspondingly shorter warranty, so they are not the cheapest alternative over the long run. Utilize one of these if you are trying to spiff up the driveway prior to selling your property. Premium goods, on the other hand, are created with high quality resins and UV stabilizers and comprise filler and elastomeric substance, so that they last longer and take a longer warranty.
Producers also make various formulas for various driveway sealing requirements: a single formulation for drives that are newer in good shape and yet another formulation for elderly drives which have not been well preserved. The 2 formulas also change in their policy, so read the labels carefully and select the right sealer and volume for your specific driveway. Follow the manufacturer's instructions for the kind of applicator to utilize (brush or squeegee). Using the incorrect one may lead to premature failure. You will also require liquid drive cleaner/degreaser to eliminate oil and tree sap. If your driveway has observable oil stains, then get a jar of oil spot primer.
Check the weather Prior to Starting
You are going to want at least two times of warm weather to secure your driveway. And, it is ideal to prevent scorching-hot bright days (the sealer may dry too quickly). Should you dismiss the weather prediction, you might find $100 value of sealer wash off in a heavy rain.
- Home improvement tips
Fireplace Design Ideas
Particularly as the weather begins to cool off for many of us around the globe, as we approach Fall and Winter seasons, our fireplaces might begin to see a little more use. If we’re going to use them, why not make them as beautiful as they are functional?!
Stunning corner fireplace design
Here are wood fireplaces columbus, oh ideas to inspire and motivate you. Any of these would really make your fireplace a place to gather…for more reasons than just warmth.
Corner fireplace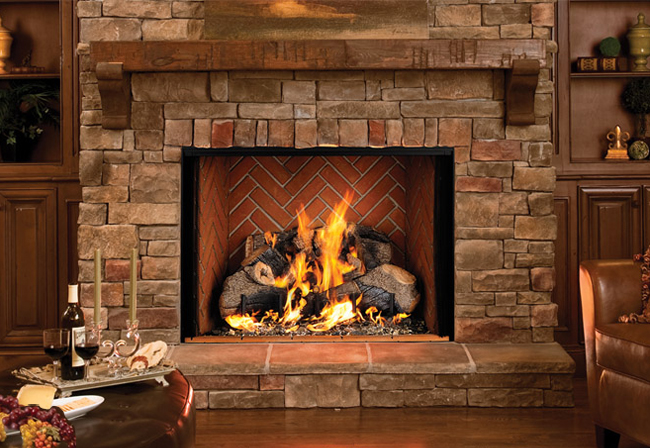
Got a floating wall that needs some presence? Install a gorgeous two-sided contemporary fireplace on the wall’s end. This will increase the impact of your fireplace because you can enjoy the fire from multiple angles, plus it just creates a natural draw into the room itself.
Framing trim.
Install trim around your fireplace that frames the fireplace itself. We love this tiered trimming concept, done in all white like the rest of the room’s walls, as an accentuation of the fireplace itself. Classic and clean architectural detail that packs a punch.
Chunky wood mantel
Fireplaces themselves can’t be made of wood…for obvious reasons. But that doesn’t mean this warm natural material should be avoided altogether. In this stunning fireplace setting, for example, a chunky wood mantel and equally substantial corbels bring warmth and provide a distinct separation between the mantel face and the upper wall.
Fireplace simplified
One fireplace idea that goes against the tide is a beautiful incorporation of backwards thinking. Rather than do anything at all to the fireplace, you could create a similar stunning effect by focusing your efforts on the walls behind and surrounding the fireplace. A simple white fireplace surround, for example, looks awesome against a wood-planked wall.
Simple marble surround.
The simplicity of a contemporary marble surround, with smooth surfaces and clean angles and lines, will make the fireplace the first thing everyone will notice when they come into your living room. We like the contrast of white surround with a colored wall.
- kitchen remodeling ideas
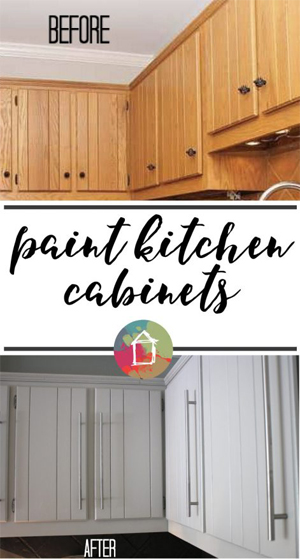
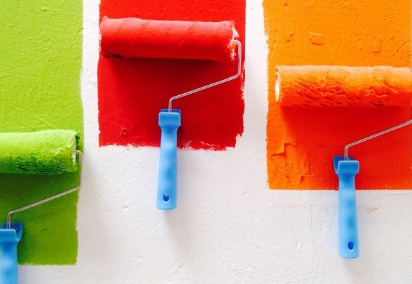
What is the Best Paint to Use on Kitchen Cabinets?
Try not to compel yourself into a re-do. Here's the way to settle on the correct choice at the beginning for an increasingly practical kitchen suggested by kitchen cabinets Pittsburgh, PA.
Grasp the Sheen
 You may cherish the flawless look of level paint (and sure, it makes a ravishing scenery for your family room or room). In any case, when it comes time to cover your kitchen, select a completion that is both simple to perfect and extreme enough to deal with continued scouring. That implies getting sparkly.
 Reflexive or semi-gleam paint is perfect for any spots that may get splattered, splashed, or spilled on, as above (or in lieu of) your backsplash, behind your junk can, or all over the place on the off chance that you love bringing spaghetti sauce to a moving bubble. Glossier completes additionally shield your dividers from water and oil, which will "bubble up and not ingest into the paint" upon contact, says Specker. "Wipe it off, and you won't have any extra stains."
In case you're persistent on the level search for your kitchen, there are claim to fame (read: expensive) paints out there that offer simple cleaning. Specker prescribes Benjamin Moore's Aura to give your kitchen dividers that high-style matte completion — insofar as you're willing to burn through $70 a gallon.The Best Paint for Kitchen Cabinets
Pick a paint that solidifies when it dries.
Oil paint is a moderate decision, yet a significant issue.
There are water-based paint choices, however they are expensive.
Numerous experts suggest utilizing an oil-based paint, which fixes to a harder surface, forestalling harm and wreckage. Purchaser be careful: Oils can be a small rancid and do take always to dry.
Sparkle Those Baseboards
Baseboards endure a huge amount of harm, from sloppy scrapes after your little girl's soccer matches to earth, residue, and morsels knocked off the ledges during cooking. Your kitchen as of now takes sufficiently long to clean. Why include an additional half-hour slouched over the baseboards?
Remember the Ceiling
The one surface in the kitchen where you need to stay away from gleaming paint is the roof. Roofs love to split and settle, so conceal those irregularities with a few (truly, presently you have authorization) level paint. The less intelligent the surface, the more subtle those breaks will look from the beginning. Polished paints will really stress these blunders and issue spots.
Zap Those Microbes Away
Pitiful kitchen incongruity: The room you need to be the freest from perilous organisms is normally inclined to them. From the form risk zones around your sink, inside cupboards, and along the dividers, to all the nourishment borne, wheeze borne, and spill-borne open doors for microbes to gain out of power, your kitchen can be a small piece alarming on the minute level.
In spite of the fact that not every person needs an antimicrobial paint, in the event that you've fought kitchen form previously, have an ailment inclined family, or just truly love realizing each surface is as sheltered as conceivable consistently, these items were made for you.
- kitchen remodeling ideas
Inexpensive bathroom renovation tips
Bathroom remodeling is 2nd only to kitchen remodeling with regards to pain, misery, dust, price, and unmet-timetables. Given the particular sickeningly high cost of restroom remodeling, it pays to think creatively. Here are several Lake Zurich bathroom remodel tips.
In the end, you will have a clean, vivid, and functional bathroom. And much more money in your bank account than property owners who went the costly route.
Cover and Re-Surface Instead of Replace
This is the helping principle of any surface-level renovation, with the caveat that you simply never want to cover anything at all because it needs to be replaced.
For instance , in bathrooms there is no much better way to cover up the lower concoction of walls than along with easy-to-install wainscot.
Wainscot is really a pre-fab board that expands as high as 48" and removes the need to fix any unlucky wall dings and minimal holes. But should that will wallboard be speckled along with mold and mildew, the last thing you want to do is usually cover it up.
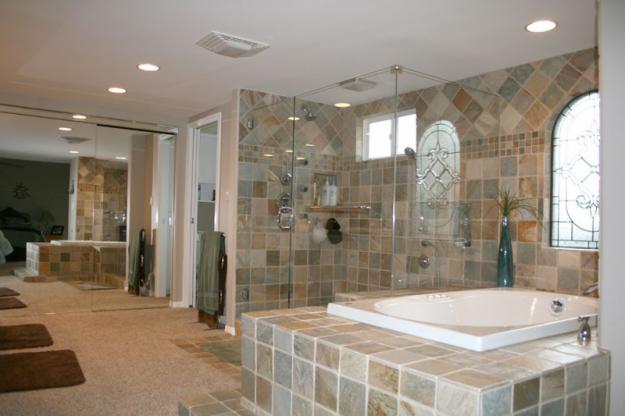
Unfortunately, you should track down the source, stop this, and replace affected servings of wallboard.
What You Will Set up Instead of That High-End Porcelain Floor...
Luxury vinyl floors.
You only think you want that will radiant-heat granite floor. Yet that purchase alone may blow your entire remodel spending budget.
Old-school vinyl is gone; items have changed. Vinyl today looks better than ever, with improvements such as luxury vinyl floors (LVF) and plank plastic that look fantastic.
Refinish Tub Instead of Replacing This
Bathtub or shower refinishing is a prime example of cover up, not replace. If the issue is mainly cosmetic--a yellowed surface area and some cracks and nicks--you can refinish your bath or bathtub.
Alternatively, bath tub and shower liners--a basic piece of infomercials--are not as inexpensive as they seem. Never an everlasting fix, they will carry a person through a few years. Liners need professional installation. Refinishing, rather, is cheaper and appears better.
Pre-Fab Shower Instead of Tiled
Have you decided that the tub or shower is usually beyond refinishing? The totally most expensive option is employing tradesmen to build a device out of tile from scratch.
Rather, consider pre-fabricated shower devices.
If you absolutely must have that will tiled shower, fusing the poly shower pan with all the tile saves some trouble and a little bit of cost.